
Physical Therapy for Shoulder Impingement: Week-by-Week Recovery
If you’ve been waking up at night because rolling onto your shoulder sends a sharp pain through your arm — or you’ve noticed that reaching for a shelf or throwing a ball has become something you dread — you already know how shoulder impingement can quietly take over your life.
The good news? Physical therapy for shoulder impingement is one of the most effective, evidence-backed treatments available, and the majority of patients recover fully without surgery. Most people see significant improvement within 6 to 12 weeks of consistent rehabilitation. But “6 to 12 weeks” is a wide range, and you deserve to know exactly what’s happening during each of those weeks, what you should feel, and what it means if you don’t feel it.
According to research published in the British Journal of Sports Medicine, structured physical therapy programs resolve shoulder impingement symptoms in up to 80% of patients — often producing outcomes equivalent to or better than surgical decompression. This guide gives you the complete picture: anatomy, diagnosis, a week-by-week exercise protocol, insurance guidance, cost breakdowns, and the red flags that mean it’s time to change course.

What Is Shoulder Impingement Syndrome?
Shoulder impingement syndrome — formally known as subacromial impingement syndrome (SIS) — is one of the most common causes of shoulder pain, accounting for an estimated 44–65% of all shoulder complaints seen in primary care and sports medicine clinics.
At its core, impingement is a mechanical problem. When the structures that live inside the subacromial space — the rotator cuff tendons and the subacromial bursa — get repeatedly compressed or “pinched” during arm movement, they become irritated and inflamed. Over time, that irritation leads to pain, weakness, and reduced range of motion.
You might recognize the hallmark symptom: a sharp or aching pain that kicks in specifically when you lift your arm between 60 and 120 degrees — a range physical therapists call the “painful arc.”
The Anatomy Behind the Pain
To understand why your shoulder hurts, it helps to picture the architecture of the joint itself.
Your shoulder is a ball-and-socket joint, where the rounded head of the humerus (upper arm bone) fits into the shallow glenoid fossa of the scapula (shoulder blade). Above that ball sits the acromion, a bony projection that forms a protective arch. Between the ball and the arch lies the subacromial space — a narrow corridor roughly 9–10 mm wide in healthy adults.
That space houses:
- The supraspinatus tendon (the most commonly affected rotator cuff tendon)
- The subacromial bursa (a fluid-filled sac that reduces friction)
- The tendon of the long head of the biceps
When the space narrows — due to bone spurs, muscle imbalances, poor posture, or repetitive overhead motions — those structures get compressed with every arm lift. The result is the cycle of inflammation → pain → guarded movement → weakness → more impingement that brings most patients to physical therapy.
Key Fact: The subacromial space narrows by up to 50% during arm elevation in people with shoulder impingement, compared to a 20–30% reduction in healthy shoulders. This mechanical narrowing is the root cause of the pinching sensation you feel.
- Clinical Massage with Gloves: Sanitary Protocols, Allergy Prevention, and Techniques
- CAMTC Certification Guide: California Massage Therapy Council Application and Fees
- Cybex Testing in Rehabilitation: How Isokinetic Assessments Measure Muscle Strength
- Biodex Isokinetic Dynamometer Testing: Clinical Purpose, Cost, and Injury Assessment
- Massage Therapy Malpractice Insurance: Cost Comparison and Policy Exclusions
Types of Shoulder Impingement
Not all impingement is the same, and your physical therapist will assess which type you have — because the treatment emphasis differs.
| Type | Description | Most Common In |
|---|---|---|
| Primary (Structural) Impingement | Caused by bony abnormalities such as a hooked acromion (Type III) or acromioclavicular joint spurs that physically reduce subacromial space | Adults 50+; gradual onset |
| Secondary (Functional) Impingement | Caused by dynamic instability — weak rotator cuff or scapular stabilizers allow the humeral head to migrate upward during movement | Young adults, overhead athletes, desk workers |
| Internal Impingement | Posterior shoulder tendons pinch between the humeral head and glenoid — different mechanics than classical SIS | Overhead throwing athletes |
| Outlet Impingement | Structural narrowing of the coracoacromial arch reduces tendon clearance | Mixed population; often associated with type II/III acromion morphology |
Expert Tip: Most shoulder impingement in people under 50 is secondary — meaning it’s driven by muscle imbalances and movement dysfunctions that physical therapy directly corrects. This is great news, because it means the underlying cause is fully addressable without surgery.
How Is Shoulder Impingement Diagnosed?
Your diagnosis journey for shoulder impingement typically begins with a physical examination, not an MRI. An experienced clinician — your physician, orthopedic specialist, or physical therapist — can identify impingement with a battery of clinical tests that are, in aggregate, highly reliable.
Clinical Tests Used by Your PT
Your physical therapist will perform several standardized tests during your initial evaluation. These tests mechanically recreate the impingement mechanism to provoke your symptoms:
Neer’s Sign: Your arm is passively raised forward with the elbow straight and the shoulder internally rotated. Reproduction of pain indicates subacromial impingement. Sensitivity ~79%, Specificity ~53%.
Hawkins-Kennedy Test: Your arm is raised to 90° forward flexion, then the shoulder is forcibly internally rotated. Pain indicates compression of the supraspinatus tendon. Sensitivity ~79%, Specificity ~59%.
Empty Can Test (Jobe’s Test): Your arm is raised to 90° in the scapular plane with the thumb pointing down (as if emptying a can). Resistance is applied downward. Weakness or pain implicates the supraspinatus. Sensitivity ~69%, Specificity ~66%.
Painful Arc Test: You actively abduct (raise sideways) your arm through a full range of motion. Pain specifically between 60–120° is a classic indicator of subacromial impingement. Specificity approaches 80%.
Expert Tip: No single test definitively diagnoses shoulder impingement. Your therapist will combine multiple test findings with your history and functional limitations to build an accurate clinical picture. A combination of positive Hawkins-Kennedy, painful arc, and infraspinatus weakness carries a positive likelihood ratio of 10.56 for subacromial impingement — making it diagnostically powerful.
Imaging: When You Need It and When You Don’t
Many patients arrive at physical therapy expecting (or worrying about) imaging. Here’s the clinical reality:
X-Ray is useful for identifying bony abnormalities such as acromial spurs, calcific tendonitis, or AC joint arthritis. It does not image soft tissue structures.
Ultrasound is excellent for dynamic assessment of tendons and bursal fluid in real time. It can detect tendon thickening, partial tears, and bursal inflammation at lower cost than MRI.
MRI provides the most comprehensive soft tissue assessment and is recommended when:
- Symptoms don’t respond to 6+ weeks of PT
- A significant rotator cuff tear is suspected
- The diagnosis is unclear
- Surgical planning is being considered
Key Fact: Studies show that up to 34% of asymptomatic adults over 40 have rotator cuff abnormalities on MRI. Imaging findings don’t always correlate with symptoms — which is why clinical assessment remains the gold standard for guiding your physical therapy program.
Can Physical Therapy Really Fix Shoulder Impingement?
The short answer: yes, for the vast majority of patients. Physical therapy is the first-line, evidence-based treatment for subacromial impingement syndrome — recommended by the American Academy of Orthopaedic Surgeons (AAOS), the National Institute for Health and Care Excellence (NICE), and virtually every major sports medicine organization worldwide.
What the Evidence Says About PT Outcomes
The evidence base for physical therapy in shoulder impingement is robust and growing:
- A landmark 2018 meta-analysis published in JAMA Internal Medicine (Beard et al.) compared arthroscopic subacromial decompression surgery to sham surgery and to supervised physiotherapy. The result: all three groups improved significantly — and there was no statistically significant difference between surgery and PT at 12 months.
- A 2013 systematic review in the Journal of Orthopaedic & Sports Physical Therapy concluded that manual therapy combined with exercise produces significantly better outcomes than exercise alone in the short term.
- Research consistently shows that strengthening the rotator cuff and scapular stabilizers — the core of physical therapy — directly addresses the mechanical root cause of secondary impingement by improving dynamic centering of the humeral head.
The key factors that determine whether PT works for you include:
- Accuracy of diagnosis — PT works best when impingement is truly the primary driver of your pain
- Severity of tissue damage — Partial thickness tears respond well to PT; full-thickness tears may require surgical consultation
- Consistency — Patients who complete their home exercise program recover faster and have lower recurrence rates
- Treatment quality — A skilled PT who progresses your program systematically gets better results than a generic protocol
Expert Tip: If your physical therapist’s treatment plan doesn’t progress beyond modalities (heat, ultrasound, TENS) within the first 2–3 weeks, ask about advancing to active exercise. Passive treatments alone do not resolve the underlying mechanical causes of shoulder impingement.

How Long Does Physical Therapy for Shoulder Impingement Take?
Physical therapy for shoulder impingement typically spans 6 to 12 weeks, with most patients attending 2–3 sessions per week in a clinical setting alongside a daily home exercise program.
Your exact timeline depends on several key variables:
- Severity of impingement — Mild, early-stage impingement responds faster (4–6 weeks) than chronic, multi-month cases
- Presence of associated pathology — Partial rotator cuff tears, calcific tendinitis, or AC joint disease extend recovery
- Age and tissue quality — Older adults and those with degenerative changes typically require a longer timeline
- Occupation and activity level — Overhead athletes and manual laborers face a longer return-to-sport/work timeline
- HEP compliance — Patients who complete their home exercises consistently recover up to 30% faster, according to clinical observation data
Recovery Timeline Summary Table
| Phase | Weeks | Primary Goal | Sessions/Week |
|---|---|---|---|
| Acute / Pain Control | 1–2 | Reduce pain and inflammation, restore passive mobility | 2–3 |
| Active Mobility | 2–3 | Restore active range of motion, begin neuromuscular re-education | 2–3 |
| Early Strengthening | 3–5 | Rotator cuff activation, scapular stabilization | 2–3 |
| Progressive Loading | 5–8 | Resistance training, improved shoulder mechanics | 2 |
| Functional Training | 7–10 | Sport/work-specific movements, full strength testing | 1–2 |
| Maintenance/Discharge | 10–12 | Independence with HEP, prevention strategies, discharge | 1 (as needed) |
Week-by-Week Physical Therapy Recovery Timeline
The following week-by-week breakdown reflects a moderate-severity shoulder impingement case in an otherwise healthy adult. Your therapist will adjust this timeline based on your individual progress and response to treatment.
Week 1: Pain Control and Initial Assessment
Your first week of physical therapy is primarily about gathering information and calming the tissue. Don’t expect dramatic improvement yet — this week is essential groundwork.
What happens in the clinic:
Your physical therapist will conduct a comprehensive initial evaluation, including:
- Full medical and injury history
- Active and passive range of motion measurements (using a goniometer)
- Strength testing of all rotator cuff muscles (graded 0–5)
- Postural assessment — looking at your head position, scapular position, and thoracic kyphosis
- Special orthopedic tests (Neer’s, Hawkins-Kennedy, Empty Can, Painful Arc)
- Functional movement screening
Treatment modalities in Week 1:
- Ice or heat application — Ice is generally preferred acutely (first 72 hours of a flare); heat before exercises to loosen tissue
- Ultrasound or electrical stimulation — Used to reduce bursal inflammation (effectiveness is modest; should not be the sole treatment)
- Manual therapy — Gentle joint mobilization of the glenohumeral and acromioclavicular joints to reduce pain and improve mobility; soft tissue massage to relieve cervical and periscapular muscle tension
- Gentle passive range of motion exercises — Pendulum swings, assisted overhead reach with the “good” arm
Pendulum Swings (Codman’s Exercise): Stand beside a table, lean forward, and place your unaffected arm on the surface for support. Let your affected arm hang freely. Using a gentle swinging motion from your body weight (not your shoulder muscles), move the arm in small circles — clockwise 10 times, counterclockwise 10 times, forward-backward 10 times, and side-to-side 10 times. Perform 2–3 times daily.
What you should feel at Week 1: Soreness during and after sessions (24–48 hours of mild aching is normal). Pain at rest should begin to decrease by day 4–5.
Warning: If you experience sharp, shooting pain that radiates down your arm into your hand during any Week 1 exercise, stop immediately and notify your therapist. This pattern may indicate cervical radiculopathy or nerve involvement — a different diagnosis that requires a different treatment approach.
Week 2: Restoring Passive Range of Motion
With acute inflammation beginning to settle, Week 2 shifts focus toward restoring full, pain-free passive range of motion — movement driven by your therapist or gravity, not your shoulder muscles.
Target mobility benchmarks by end of Week 2:
- Forward flexion: 150–160° (passive)
- Abduction: 140–150° (passive)
- External rotation (arm at side): 55–65°
- Internal rotation: Hand to low back / T10 level
Exercises introduced in Week 2:
Pendulum Swings with Light Weight: Progress to holding a 1–2 lb weight to use gravitational traction to gently mobilize the joint capsule.
Supine Passive Forward Flexion (Cane/Wand Exercise): Lie on your back holding a cane or dowel with both hands (shoulder-width apart). Use your unaffected arm to push the affected arm into forward flexion overhead. Hold at end range for 5 seconds, then slowly return. 10 reps, 2 sets.
Cross-Body Stretch (Horizontal Adduction): Bring your affected arm across your chest with the elbow straight. Use your opposite hand to gently pull the arm into horizontal adduction, stretching the posterior capsule. Hold 30 seconds × 3 reps. This stretch directly targets posterior capsule tightness — one of the most evidence-backed contributors to functional impingement.
Sleeper Stretch: Lie on your affected side with the shoulder and elbow both at 90°. Use your upper hand to gently push your lower forearm toward the floor, stretching the posterior rotator cuff. Hold 30 seconds × 3 reps.
Cervical and thoracic mobilization: Your therapist may address stiffness in the mid-back (thoracic spine), as thoracic kyphosis directly contributes to reduced subacromial space and impingement mechanics.
Key Fact: Research by McClure et al. (2006) demonstrated that posterior capsule tightness is present in up to 75% of patients with subacromial impingement. The Sleeper Stretch and Cross-Body Stretch are specifically prescribed to address this contributing factor.
Week 3: Beginning Active Strengthening
By Week 3, your pain should be noticeably reduced — ideally from a 6–7/10 at baseline to a 3–4/10 during activities. This is the phase where you begin working the muscles directly involved in correcting the impingement mechanism.
The emphasis in Week 3 is on scapular stabilization and low-load rotator cuff activation — training the muscles that keep the humeral head properly centered and the scapula properly positioned.
Why scapular stabilization comes first:
The scapula (shoulder blade) acts as the foundation of your shoulder. For your arm to lift without impingement, the scapula must rotate upward, tilt posteriorly, and retract slightly as your arm rises — a coordinated motion called scapulohumeral rhythm. When the muscles responsible (serratus anterior, lower/middle trapezius) are weak or inhibited, this rhythm breaks down, the subacromial space narrows, and impingement occurs.
Week 3 exercises:
Scapular Retractions (Rows): Sit or stand tall. Squeeze your shoulder blades together and downward as if trying to hold a pencil between them. Hold 5 seconds, release. 15 reps × 3 sets. Keep your neck relaxed — don’t shrug.
Wall Slides: Stand with your back against a wall, arms at 90° with elbows and wrists touching the wall. Slowly slide your arms upward along the wall (like a snow angel, but against a wall), maintaining full contact throughout. This activates serratus anterior and lower trapezius while reinforcing correct scapulohumeral rhythm. 10 reps × 3 sets.
Isometric External Rotation: Stand with your elbow bent at 90°, elbow at your side, forearm parallel to the floor. Press the back of your wrist into a doorframe or wall as if trying to rotate your arm outward. Hold 10 seconds. 10 reps × 3 sets.
Isometric Internal Rotation: Same position — now press the palm of your hand into the wall. Hold 10 seconds × 10 reps × 3 sets.
Chin Tucks: Often overlooked, this simple exercise corrects the forward head posture that loads the cervical and upper thoracic spine — directly affecting shoulder mechanics. Gently retract your chin (as if making a double chin), hold 5 seconds. 15 reps × 3 sets.
Expert Tip: These isometric exercises may seem too easy to make a difference. Don’t underestimate them. Isometric loading at submaximal intensity is highly effective for tendon remodeling and reducing tendon pain, according to research by Cook and Purdam (2009) published in the British Journal of Sports Medicine.
Week 4: The Foundation Phase — Adding Resistance
Week 4 marks a meaningful turning point. Your pain should now be manageable (1–3/10 at rest, 3–5/10 with activity), your passive range of motion should be nearly full, and your therapist will begin introducing progressive resistance to the rotator cuff program.
The goal this week is to build the rotator cuff force couple — the coordinated activation of the four rotator cuff muscles (supraspinatus, infraspinatus, teres minor, subscapularis) that dynamically centers the humeral head during movement.
Exercises introduced in Week 4:
Side-Lying External Rotation (with resistance): Lie on your non-affected side with a folded towel under your elbow to position the shoulder in slight abduction. Hold a light dumbbell (1–3 lbs) with the elbow bent at 90°. Slowly rotate the forearm upward (toward the ceiling) until it’s vertical, then lower slowly. The lowering phase (eccentric) is as important as the lifting phase. 3 × 12–15 reps.
Prone Y, T, W Exercises: Lie face-down on a table or elevated surface with your arms hanging toward the floor. Lift your arms in three positions:
- Y: arms at 135° (overhead, thumbs up) — targets lower trapezius
- T: arms at 90° (T-position, thumbs up) — targets middle trapezius
- W: elbows bent at 90°, pull elbows back (W-shape) — targets rhomboids and posterior rotator cuff
Start with bodyweight only. 3 × 10 reps each position.
Doorway Pec Stretch: Stand in a doorframe with your elbow bent at 90°, forearm resting on the frame. Step forward gently until you feel a stretch across the front of your chest and shoulder. Hold 30 seconds × 3 reps. Tight pectoralis minor is a major driver of scapular anterior tilt, which reduces subacromial space.
Resistance Band External Rotation: Anchor a resistance band at elbow height. Stand perpendicular to the anchor. Keep your elbow at your side, bent at 90°. Slowly rotate your forearm away from the band anchor (external rotation) against gentle resistance. 3 × 15 reps.
| Exercise | Target Muscle | Sets × Reps | Week Introduced |
|---|---|---|---|
| Pendulum Swings | Joint mobility | 3 × 10 each direction | Week 1 |
| Cross-Body Stretch | Posterior capsule | 3 × 30 sec | Week 2 |
| Sleeper Stretch | Posterior capsule | 3 × 30 sec | Week 2 |
| Scapular Retractions | Mid/lower trapezius | 3 × 15 | Week 3 |
| Wall Slides | Serratus anterior | 3 × 10 | Week 3 |
| Isometric ER/IR | Rotator cuff | 3 × 10 × 10 sec | Week 3 |
| Side-Lying ER | Infraspinatus, teres minor | 3 × 12 | Week 4 |
| Prone Y, T, W | Trapezius, rhomboids | 3 × 10 each | Week 4 |
| Band External Rotation | Infraspinatus, teres minor | 3 × 15 | Week 4 |
Warning: Avoid any overhead pressing, behind-the-neck exercises, or wide-grip upright rows during Weeks 1–4. These movements maximally narrow the subacromial space and can significantly set back your recovery.
Weeks 5–6: Progressive Resistance Loading
By Weeks 5–6, you’ve built a foundation of mobility and basic rotator cuff strength. Now it’s time to apply progressive overload — systematically increasing the resistance and complexity of your exercises to continue driving strength adaptations.
This phase is when most patients notice a significant, encouraging jump in their functional capacity. Activities that were previously painful — reaching overhead, sleeping on the affected side, throwing a ball — begin to feel more manageable.
Key exercises in Weeks 5–6:
Resisted Shoulder Abduction (Scapular Plane): Stand with a resistance band under your foot. Raise your arm out to the side and slightly forward (30° in front of the coronal plane — the scapular plane), thumbs up, stopping at shoulder height (90°). Do NOT raise above shoulder height yet. 3 × 12–15 reps.
Resisted Forward Flexion: Same band setup, now raise your arm straight forward to 90°. 3 × 12–15 reps.
Diagonal Patterns (PNF D2 Flexion): Starting with your hand at your opposite hip (palm down), swing your arm diagonally across your body and upward, finishing overhead with the palm facing up and the arm externally rotated. This proprioceptive neuromuscular facilitation (PNF) pattern trains the integrated activation pattern of the rotator cuff in a functional movement arc. 3 × 10 reps.
Shoulder Retraction/Depression Rows: Using a resistance band anchored in front of you at shoulder height, perform a row motion: pull the band toward you, leading with your elbows, squeezing your shoulder blades together and downward. 3 × 15 reps.
Foam Roller Thoracic Extension: Place a foam roller horizontally across your mid-back (thoracic spine, around T4–T8). Let your arms fold across your chest and gently extend backward over the roller. Move the roller superiorly and inferiorly to target multiple thoracic segments. 60 seconds daily. This dramatically improves the thoracic extension necessary for overhead arm elevation.
Key Fact: A 2020 study in the Journal of Shoulder and Elbow Surgery found that adding thoracic spine manipulation to standard rotator cuff rehabilitation significantly reduced pain and improved shoulder function compared to rotator cuff exercises alone — with benefits apparent as early as Week 4 of treatment.
Weeks 7–8: Functional Strengthening and Sport-Specific Preparation
Weeks 7 and 8 represent the bridge between rehabilitation and real life. Your pain should now be minimal at rest (0–1/10) and only provoked by end-range overhead activities or heavy loading. Full range of motion should be restored.
The focus shifts to higher-load, multi-plane, functional movements that replicate the demands of your sport, occupation, or daily activities.
Exercises in Weeks 7–8:
Overhead Press (Limited Range): Begin with a dumbbell (light weight — 40–50% of what you’d typically press). Press upward to about 120° — not fully overhead yet. 3 × 10 reps. Your PT may clear you to progress to full overhead press based on your symptom response.
Serratus Punch (Push-Up Plus): Start in a push-up position (or on knees). Perform a standard push-up, and at the top, protract your shoulder blades forward (push the floor away from you), rounding your upper back slightly. This end-range scapular protraction maximally activates serratus anterior — the most important scapular upward rotation muscle. 3 × 10 reps.
Closed Kinetic Chain Exercises: Wall push-ups progressing to incline push-ups progressing to standard push-ups. These load the shoulder in a position that naturally co-contracts the rotator cuff for dynamic stability.
Sport-Specific Reintroduction:
- Swimmers: Begin flutter kick-only sets, add single-arm pulling at low intensity, monitoring for impingement symptoms at catch phase
- Racket sport athletes: Begin groundstroke simulation with light racket, then progress to serving mechanics at 50% intensity
- Overhead workers: Practice simulated work tasks with gradually increasing weights
Expert Tip: During sport-specific reintroduction, use the 10% rule — do not increase the volume or intensity of any overhead activity by more than 10% per week. This guideline, adapted from running injury prevention research, helps prevent the tissue overload that causes setbacks.
Weeks 9–10: Return to Full Activity
At this point in your shoulder impingement recovery timeline, you should be approaching or achieving full, pain-free function. Your therapist will conduct formal re-testing of your range of motion and rotator cuff strength to compare against your Week 1 baseline.
Functional benchmarks for return to activity:
- Pain: 0–1/10 with all tested movements, including full overhead reach
- Strength: Affected shoulder within 10% of unaffected shoulder on manual muscle testing or handheld dynamometry
- Range of motion: Within 10° of the unaffected side in all planes
- Functional tasks: Able to perform overhead activities of daily living (ADLs) without pain or compensation patterns
Advanced exercises in Weeks 9–10:
Full Overhead Press with Dumbbells: Progress to full overhead pressing motion with appropriate load (start at 50–60% of pre-injury capacity).
Diagonal Cable or Band Patterns: Full D1 and D2 patterns with appropriate resistance, emphasizing smooth, coordinated movement.
Medicine Ball Exercises: Overhead throws, wall catches, rotational throws — for patients returning to throwing or racket sports.
Plyometric Shoulder Exercises: Rapid catch-and-release drills against a rebounder wall or with a partner, building reactive neuromuscular control.
Weeks 11–12: Discharge and Long-Term Maintenance
The final phase of your formal physical therapy program transitions you from clinical care to self-managed independence. Your therapist will:
- Perform final outcome measurements (pain, ROM, strength, functional scores)
- Discuss long-term maintenance exercises (typically a condensed 15–20 minute routine 3x/week)
- Educate you on warning signs that warrant return to PT
- Provide a written Home Exercise Program for ongoing use
Key discharge criteria:
| Criterion | Target |
|---|---|
| Resting pain | 0/10 |
| Pain with full overhead activity | ≤ 1/10 |
| Shoulder strength (affected vs. unaffected) | ≥ 90% |
| Range of motion (affected vs. unaffected) | ≥ 95% |
| Return to full occupational/sports activities | Yes, without modification |
| Independence with HEP | Confirmed |
Key Fact: Research shows that patients who continue a structured maintenance exercise program after discharge have a recurrence rate of approximately 15% at 1 year — compared to a recurrence rate of up to 45% in those who stop exercising after discharge. Your HEP isn’t optional maintenance — it’s injury prevention.

What If Physical Therapy Isn’t Working?
Most patients make steady, linear progress through the phases above. But PT doesn’t always follow a straight line — and sometimes, it genuinely plateaus. Here’s how to tell the difference between a normal temporary setback and a signal that something else is going on.
Common Reasons PT Stalls
1. Misdiagnosis or missed pathology Shoulder impingement is sometimes the surface diagnosis that overlies a more complex condition. A partial or full-thickness rotator cuff tear, cervical radiculopathy, SLAP labral tear, or adhesive capsulitis (frozen shoulder) can all present with impingement-like symptoms but require different treatment approaches.
2. Insufficient treatment intensity or frequency If your PT visits consist primarily of passive modalities (heat packs, electrical stimulation) without progressive exercise, you’re unlikely to address the root mechanical causes.
3. Non-compliance with HEP Clinically, patients who skip their home exercises recover significantly slower. Shoulder impingement recovery is dose-dependent — the tissue adaptation that resolves impingement requires consistent mechanical loading.
4. Ongoing provocative activity If you’re continuing overhead work, swimming, or upper-body weight training that reproduces your impingement pain throughout your PT program, your tissue cannot heal efficiently.
5. Calcific tendinitis Calcium deposits within the supraspinatus tendon can be a source of pain that is poorly responsive to standard PT. Needling, barbotage (ultrasound-guided aspiration), or shockwave therapy may be necessary.
6. Acromioclavicular (AC) joint pathology Pain from the AC joint (the joint at the top of your shoulder where the collarbone meets the shoulder blade) can mimic subacromial impingement but responds differently to treatment.
Next Steps When Conservative Care Falls Short
If you’ve completed 6–12 weeks of consistent, well-structured physical therapy with minimal improvement (less than 30% reduction in pain, no meaningful functional gains), the following options should be discussed with your orthopedic physician:
- Corticosteroid injection: A subacromial cortisone injection can rapidly reduce bursal inflammation, creating a therapeutic window that allows more effective PT. Evidence supports 1–2 injections as an adjunct — not a standalone treatment — for chronic impingement.
- Ultrasound-guided barbotage: For calcific tendinitis specifically, this procedure needles and aspirates calcium deposits under ultrasound guidance with excellent outcomes.
- Shockwave therapy (ESWT): Extracorporeal shockwave therapy has Level 1A evidence for calcific tendinitis and emerging evidence for chronic tendinopathy.
- Platelet-rich plasma (PRP) injection: Emerging evidence for partial rotator cuff tears, though methodological quality of trials remains mixed.
- Surgical consultation (arthroscopic subacromial decompression): Considered when all conservative measures fail, though recent landmark trials question its superiority over PT alone.
Warning: Before agreeing to surgery, ensure you have completed a minimum 12-week course of supervised physical therapy. The AAOS and NHS guidelines both specify that surgery should only be considered after an adequate conservative trial. Multiple clinical trials show that well-supervised PT achieves equivalent long-term outcomes to surgery for primary subacromial impingement.
How Many Physical Therapy Visits Do You Need?
For a standard course of physical therapy for shoulder impingement, you can expect:
- Total visits: 12–24 over 6–12 weeks
- Frequency: 2–3 sessions per week in acute phases, tapering to 1–2 sessions per week in later phases
- Session length: 45–60 minutes per visit
The exact number depends on your severity, progression, and insurance coverage. Research suggests that outcomes plateau around 18–20 visits for most uncomplicated shoulder impingement cases — meaning additional visits beyond that range tend to provide diminishing returns unless your case has complicating factors.
What Insurance Typically Approves
Insurance approval for physical therapy varies significantly by plan, but here are general benchmarks for 2025–2026:
| Insurance Type | Typical PT Visit Coverage | Annual Visit Limit | Authorization Required? |
|---|---|---|---|
| Commercial/PPO | 80% after deductible (in-network) | 20–40 visits | Often after visit 10–12 |
| HMO | Copay ($20–$50/visit) | 20–30 visits | Yes — usually requires referral |
| Medicare Part B | 80% of approved amount | No hard cap (medically necessary) | Not typically required |
| Medicaid | Varies by state | Typically 20–30 visits/year | Yes — prior auth common |
| Workers’ Comp | Usually 100% | Varies by injury/state | Yes |
| UMR/Self-insured plans | 70–90% after deductible | 20–60 visits | Often required after 6–10 visits |
Expert Tip: If your insurer limits you to fewer visits than your clinical progress warrants, your physical therapist can write a letter of medical necessity with objective functional data to support an appeal. Keep documentation of your progress metrics (ROM measurements, strength test results, functional outcome scores) at every visit to support these appeals.
Physical Therapy for Shoulder Impingement: Full Cost Breakdown
Understanding the financial side of your recovery helps you plan realistically and avoid surprise bills.
Without Insurance
| Service | Average Cost (USA, 2025) |
|---|---|
| Initial PT evaluation (60–90 min) | $150–$350 |
| Follow-up PT session (45–60 min) | $100–$250 |
| Full 12-week course (18 visits) | $1,800–$4,500 |
| Corticosteroid injection (if needed) | $200–$600 |
| Shoulder ultrasound | $150–$400 |
| MRI shoulder (without contrast) | $400–$1,500 |
| Resistance bands (home HEP) | $15–$40 |
| Foam roller (home HEP) | $20–$50 |
Costs vary significantly by geographic region, clinic type, and individual therapist fees. Urban areas and hospital-based PT clinics typically charge 20–40% more than private outpatient clinics.
With Insurance
Your out-of-pocket cost with insurance is determined by three factors:
- Deductible: What you must pay before insurance begins sharing costs. Average individual deductible for employer-sponsored plans is approximately $1,800 (2025 KFF Employer Health Benefits Survey).
- Copay or coinsurance: Your share per visit after deductible is met. Typically $20–$60 copay or 20–30% coinsurance.
- Out-of-pocket maximum: The most you’ll pay in a plan year. Once met, insurance covers 100%.
Practical example: If your plan has a $1,500 deductible, $40 PT copay, and you attend 20 PT visits:
- If deductible not yet met: First several visits apply to deductible at full cost (~$150/visit)
- Once deductible met: $40 × remaining visits = significantly reduced out-of-pocket
- Total estimated out-of-pocket: $1,200–$2,000 depending on timing within plan year
Key Fact: Telehealth physical therapy has expanded dramatically since 2020 and is now covered by most major insurers. For shoulder impingement patients who live far from clinics or have transportation barriers, telehealth PT for exercise prescription and monitoring is a cost-effective, evidence-supported alternative — particularly for Weeks 5–12 when independent exercise compliance is the primary goal.
The Role of Your Home Exercise Program (HEP)
If there’s one factor that most reliably separates patients who fully recover from those who plateau or relapse, it’s home exercise program compliance.
Your in-clinic sessions with your physical therapist — even at 3x/week — account for just 3–4.5 hours of your week. The remaining 163+ hours, your tissue is responding to everything else you do: your posture, your sleep position, your activities, and whether or not you complete your exercises.
Why Home Exercises Make or Break Your Recovery
Research from the Physiotherapy journal (Jack et al., 2010) found that patients with high HEP compliance achieved 50% greater functional improvement at 6 weeks compared to low-compliance patients receiving identical in-clinic care.
The biological rationale is straightforward: tendon remodeling — the process by which damaged, disorganized collagen fibers are replaced with aligned, load-tolerant tissue — requires repeated mechanical loading at the right intensity, frequency, and progression. This cannot happen in three 45-minute sessions per week alone.
Strategies to maximize your HEP compliance:
- Habit-stack your exercises: Attach them to existing daily habits (morning coffee, evening TV time) to remove the friction of finding time
- Use a visual tracker: A simple paper calendar with checkboxes creates accountability and momentum
- Keep equipment accessible: Leave your resistance band and foam roller visible, not stored away
- Follow the 2/10 rule: If pain during any exercise exceeds 2/10 greater than your baseline, reduce resistance or range of motion rather than skipping the exercise entirely
- Communicate with your therapist: Report exactly what you’re doing and feeling between sessions — accurate feedback allows them to progress or modify your program appropriately
Your typical HEP at Week 6 (example):
| Exercise | Sets × Reps | Rest | Frequency |
|---|---|---|---|
| Sleeper Stretch | 3 × 30 sec | 30 sec | Daily |
| Cross-Body Stretch | 3 × 30 sec | 30 sec | Daily |
| Wall Slides | 3 × 12 | 30 sec | Daily |
| Band External Rotation | 3 × 15 | 60 sec | Daily |
| Prone Y, T, W | 3 × 10 each | 60 sec | 5x/week |
| Foam Roller Thoracic Extension | 60 sec | — | Daily |
Total time: Approximately 20–25 minutes per session.
Special Populations: Adjusted Recovery Timelines
While the week-by-week timeline above represents a general framework, certain populations face distinct challenges and should expect modified timelines.
Overhead Athletes
Swimmers, baseball pitchers, volleyball players, tennis players, and gymnasts place enormous, repetitive demands on the subacromial space. For these athletes, physical therapy for shoulder impingement must address not only tissue healing but also sport-specific movement mechanics, throwing or stroke mechanics, and progressive return-to-sport loading.
Expected timeline: 12–16 weeks to full return to sport Key additions to standard protocol:
- High-volume eccentric loading programs for the rotator cuff
- Throwing mechanics or stroke analysis
- Scapular control under high-velocity, fatigued conditions
- Sport-specific plyometric progressions
Adults Over 60
Older adults with shoulder impingement frequently have associated degenerative changes — rotator cuff thinning or partial tearing, AC joint arthritis, or calcific tendinitis — that complicate recovery. Additionally, tissue healing rates are slower and strength gains may be more gradual.
Expected timeline: 12–20 weeks Key modifications:
- Lower initial resistance, slower progression
- Greater emphasis on pain management and activity modification
- Aquatic therapy may be highly beneficial (buoyancy reduces shoulder loading while allowing full movement)
- Closer monitoring for frozen shoulder (adhesive capsulitis) — a serious secondary complication more common in this age group
Desk Workers
Prolonged sitting in a forward head, rounded shoulder posture keeps the pectoralis minor shortened, the lower trapezius inhibited, and the thoracic spine stiffened — all of which directly narrow the subacromial space. Desk workers with impingement often present with posture-driven, secondary impingement that responds excellently to PT but requires concurrent workstation ergonomic modification.
Expected timeline: 6–10 weeks with ergonomic intervention Key additions:
- Workstation ergonomics assessment (monitor height, keyboard position, chair setup)
- Hourly postural reset reminders during the work day
- Thoracic extension mobility as a daily priority
- Strengthening of the deep cervical flexors alongside the shoulder program
Expert Tip: For desk workers, a 30-second postural reset every hour — chin tuck, scapular squeeze, thoracic extension stretch — can meaningfully reduce the cumulative mechanical load on the shoulder throughout the work day. Integrate this into your schedule as a calendar reminder.
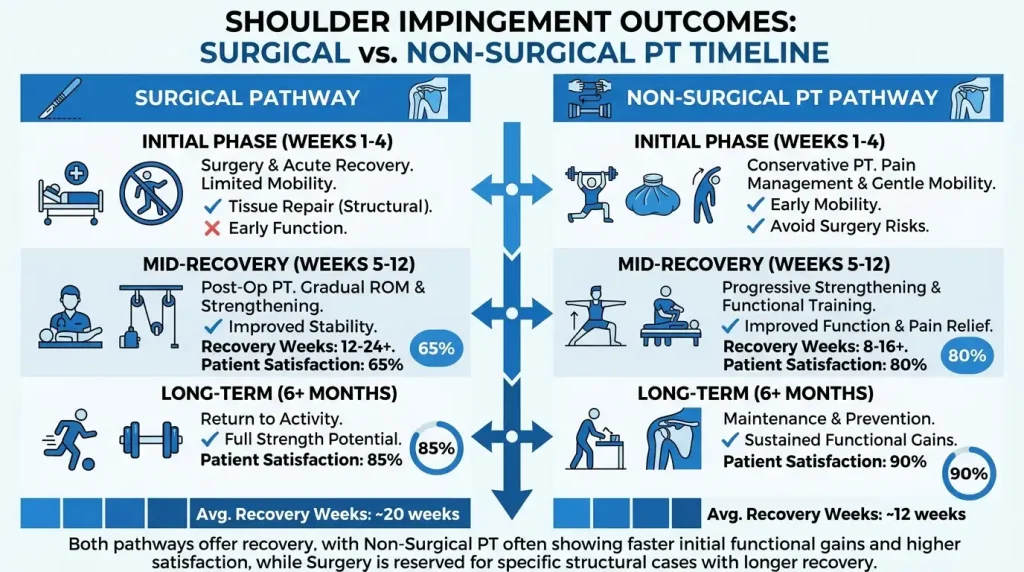
Surgery vs. Physical Therapy: What the Research Really Shows
The surgical option for shoulder impingement — arthroscopic subacromial decompression (ASD), in which a portion of the acromion is shaved down to widen the subacromial space — was for decades the default escalation when PT “failed.” Recent landmark research has profoundly changed this conversation.
Key Clinical Trial Findings
The CSAW Trial (Beard et al., BMJ 2018): 328 patients were randomized to: (1) arthroscopic subacromial decompression, (2) sham surgery (arthroscopy without decompression), or (3) no surgery. At 12 months, all three groups improved significantly — and there was no statistically significant difference between groups in pain or function scores. The surgical groups did not outperform sham surgery.
The FIMPACT Trial (Paavola et al., JAMA 2018): Finnish RCT of 210 patients randomized to ASD versus sham surgery. At 24 months, again no significant differences in outcomes between groups.
Systematic Review — Coghlan et al. (2008): Earlier review concluded that PT is at least as effective as surgery for subacromial impingement, and surgical evidence is undermined by lack of high-quality controlled trials.
| Outcome Measure | PT (Conservative) | Arthroscopic Surgery | Sham Surgery |
|---|---|---|---|
| Pain reduction at 12 months | Significant | Significant | Significant |
| Functional improvement | Significant | Significant | Significant |
| Return to work/sport | Yes | Yes | Yes |
| Complication risk | Minimal | 1–3% (surgical) | Minimal |
| Time to return to activity | 8–12 weeks | 3–6 months | N/A |
| Cost | $2,000–$5,000 | $10,000–$25,000+ | N/A |
Key Fact: Based on accumulated evidence, the British Orthopaedic Association and NHS now advise that surgery for shoulder impingement should only be considered after a documented failure of at least 3–6 months of supervised physiotherapy. Many leading orthopedic surgeons have substantially reduced their operative rates for this diagnosis.
This doesn’t mean surgery is never appropriate — structural causes (severe Type III acromial morphology, full-thickness rotator cuff tears, calcific deposits) can legitimately benefit from surgical intervention. But for the majority of patients with functional impingement, the data clearly supports exhausting conservative PT first.
Preventing Shoulder Impingement from Coming Back
Successfully completing physical therapy for shoulder impingement is a significant achievement — but shoulder impingement has a recurrence rate of 25–45% at 1 year in patients who return to previous activity levels without maintenance exercise.
Prevention is not about avoiding activity. It’s about maintaining the shoulder health adaptations your PT program created.
Long-Term Maintenance Strategies
1. Maintain your rotator cuff strengthening program A condensed maintenance routine — 2–3 exercises, 3x/week, 15–20 minutes — is sufficient to maintain the strength adaptations that protect your subacromial space. The specific exercises depend on your individual weakness profile (as identified during your PT), but typically include:
- Side-lying or banded external rotation (infraspinatus/teres minor maintenance)
- Prone Y or lower trap row (scapular stabilizer maintenance)
- One overhead press movement (functional overhead tolerance)
2. Maintain thoracic mobility Daily or every-other-day foam roller thoracic extension takes under 2 minutes and preserves the thoracic extension that allows proper scapulohumeral mechanics.
3. Optimize your posture during prolonged sitting or driving The forward head, rounded shoulder position of prolonged sitting is perhaps the most insidious driver of recurrent shoulder impingement for desk workers. Use a lumbar roll, set reminders for postural resets, and prioritize breaks.
4. Warm up before overhead activity Spend 5–10 minutes on band external rotation, wall slides, and thoracic extension before swimming, weightlifting, or overhead sport activities.
5. Progress overhead activities gradually The 10% rule applies to long-term training as well. When returning to heavy overhead pressing or high-volume throwing after a break, build volume gradually — the rotator cuff de-adapts faster than it might appear.
6. Address sleep position Sleeping on your affected shoulder compresses the subacromial space for hours at a time. Sleep on your back or on your unaffected side with your arm supported on a pillow. Many patients find a body pillow helpful for maintaining side-sleeping position without shoulder compression.
Expert Tip: Annual check-ins with a physical therapist — even a single 30–45 minute visit — can identify emerging imbalances, mobility restrictions, or movement dysfunctions before they progress to symptomatic impingement. Think of it like an annual tune-up for your shoulder, just as you’d service your car.
Frequently Asked Questions
How many weeks of physical therapy do I need for shoulder impingement?
Most patients with shoulder impingement need 6 to 12 weeks of physical therapy, attending 2–3 sessions per week. Mild cases with early presentation may resolve in as few as 4–6 weeks. Chronic cases, cases with associated rotator cuff pathology, or cases in overhead athletes may require 12–20 weeks for full return to activity. The single most important variable in your timeline is consistency with your home exercise program — patients who complete their prescribed exercises between sessions progress significantly faster than those who don’t.
Can I exercise at home instead of going to physical therapy?
While online exercise programs and YouTube videos can provide useful exercises, they cannot replace the value of an in-person evaluation for shoulder impingement. Your physical therapist identifies why the impingement is happening — whether it’s posterior capsule tightness, lower trapezius weakness, thoracic stiffness, or a combination — and builds a targeted program around your specific deficits. Self-guided exercise with the wrong focus may actually worsen your symptoms. That said, once you’ve been properly evaluated and given a personalized program, your home exercise compliance is more important than the frequency of in-clinic visits.
Is shoulder impingement the same as a rotator cuff tear?
No — but the two can coexist and are often confused. Shoulder impingement refers to the mechanical compression of the subacromial structures (tendons and bursa) when the arm is raised. Rotator cuff tears are structural damage to the tendon itself, ranging from small partial-thickness defects to complete full-thickness ruptures. Chronic, untreated impingement can progress to rotator cuff tears over time as the tendons are repeatedly compressed and abraded. An MRI or diagnostic ultrasound can differentiate between the two, and your physical therapist can clinically screen for the likelihood of a significant tear during your initial evaluation.
Can I continue working out while doing PT for shoulder impingement?
Yes, with modifications. Lower body training, cardiovascular exercise (walking, cycling, elliptical), and core strengthening are generally entirely appropriate during shoulder impingement rehabilitation. For upper body training, you’ll typically need to temporarily avoid: overhead pressing, upright rows, wide-grip bench press, pull-ups with shoulder impingement symptoms, and behind-the-neck movements. Your physical therapist will advise specific exercise modifications tailored to your case and will progressively return you to full upper body training as your shoulder mechanics and pain tolerance improve.
What is the fastest way to recover from shoulder impingement?
The fastest path to recovery from shoulder impingement involves four parallel strategies: (1) starting evidence-based physical therapy promptly — delays in starting PT allow compensatory patterns to develop and may allow inflammation to become chronic; (2) completing your home exercise program daily — the dose-response relationship between exercise frequency and tissue adaptation is the most powerful lever you have; (3) temporarily modifying provocative activities — continuing to perform overhead activities that reproduce sharp impingement pain impairs tissue healing; and (4) optimizing sleep position — avoiding compression on the affected shoulder overnight makes a meaningful difference in overnight recovery and morning stiffness.
Does shoulder impingement ever go away on its own?
Mild shoulder impingement can improve without formal treatment, particularly if the provoking activity (e.g., an overhead sport or construction work) is temporarily discontinued. However, the underlying muscle imbalances and mechanical dysfunctions that caused the impingement rarely resolve on their own — meaning that a return to activity typically produces a return of symptoms. Without addressing the root causes (weak rotator cuff, poor scapular control, posterior capsule tightness), impingement commonly becomes chronic and can progress to rotator cuff tearing. Seeking early physical therapy treatment is strongly recommended rather than adopting a watchful waiting approach beyond 4–6 weeks.
Should I use heat or ice on my shoulder?
The answer depends on the phase of your recovery and the nature of your symptoms. Ice is most beneficial in the acute phase (first 72 hours after a flare or new onset) and for post-exercise soreness — apply for 15–20 minutes with a cloth barrier to protect the skin. Heat is more appropriate before exercise or stretching to increase tissue extensibility and improve blood flow to the joint. During your PT program, your therapist may recommend applying heat for 10 minutes before your home exercises and ice for 10–15 minutes afterward. In general, ice reduces pain and swelling; heat reduces stiffness and improves mobility. Neither replaces exercise.
Key Takeaways
- Physical therapy for shoulder impingement is the gold-standard first-line treatment, resolving symptoms in up to 80% of patients without surgery.
- Most patients recover in 6 to 12 weeks with 2–3 PT sessions per week and a daily home exercise program.
- The three core phases of PT — pain control, scapular stabilization, and progressive rotator cuff strengthening — must be sequenced correctly for optimal outcomes.
- Posterior capsule tightness and scapular stabilizer weakness are the two most clinically significant mechanical contributors to functional shoulder impingement, and both respond well to targeted physical therapy.
- Recent landmark clinical trials (CSAW, FIMPACT) demonstrate that PT achieves equivalent outcomes to arthroscopic surgery for most patients — at a fraction of the cost and risk.
- If your symptoms haven’t improved by Week 6, request a reassessment — you may have a missed diagnosis (rotator cuff tear, AC joint pathology, calcific tendinitis) that requires a modified approach.
- Home exercise compliance is the single most powerful predictor of recovery speed and long-term recurrence prevention.
- Special populations — overhead athletes, adults 60+, and desk workers — require individualized timeline modifications and program adjustments.
- After discharge, a condensed maintenance routine (15–20 min, 3x/week) dramatically reduces your recurrence risk from ~45% to ~15%.
Always consult a licensed physical therapist for a personalized rehabilitation program. This article is intended for educational purposes and does not constitute medical advice. If you experience red flags such as progressive neurological symptoms, severe night pain unrelated to position, or symptoms that worsen despite 4+ weeks of PT, seek prompt medical evaluation.
- Clinical Massage with Gloves: Sanitary Protocols, Allergy Prevention, and Techniques
- CAMTC Certification Guide: California Massage Therapy Council Application and Fees
- Cybex Testing in Rehabilitation: How Isokinetic Assessments Measure Muscle Strength
- Biodex Isokinetic Dynamometer Testing: Clinical Purpose, Cost, and Injury Assessment
- Massage Therapy Malpractice Insurance: Cost Comparison and Policy Exclusions

